What is PGP/GPG?
December 25, 2023 | 1,897 words | 9min read
In this post, I provide an example of implementing digital signatures for blog posts. While this method works, I no longer use it due to a switch in my Hugo theme for my website.
To quote Wikipedia, “Pretty Good Privacy (PGP) is an encryption program that provides cryptographic privacy and authentication for data communication.” It is widely used for sending encrypted emails, encrypting sensitive files and digitally signing files.
The popularity of PGP can be attributed to multiple factors, two of which I want to note: the software was originally spread as freeware, and its encryption method which employs symmetric-key cryptography and public-key cryptography.
Building upon the original PGP, a standard was established called OpenPGP. Today there exist many product which comply with the OpenPGP standard, and one such software is GNU Privacy Guard (GPG), a free and open source implementation of PGP. GPG is commonly included as standard on many Linux operating systems.
From this point onward, my focus will be on GPG,although many, if not most, of the aspects discussed also apply to PGP.
How does GPG work?
Sending encrypted messages
When user A intends to send a message m to a user B using GPG, both parties must first generate a GPG key, consisting of a public key and a private key.
Following the key generation, user B needs to share their public key with user A. Subsequently, user A utilizes the provided public key from user B to encrypt the message m. One encrypted user A can sent their encoded message to user B.
To decrypt the received message, user B employs their private key, which only known by them. Upon the finish of the decryption process, the original message m sent by user A will be revealed.

Digitally Signing
One problem when receiving some kind of file such as a text or a binary is how can you trust that the file comes really from the source that you think it comes from and that it wasn’t altered? For instance, how can you make sure the program you downloaded really is the program you were looking for and not some kind of malware?
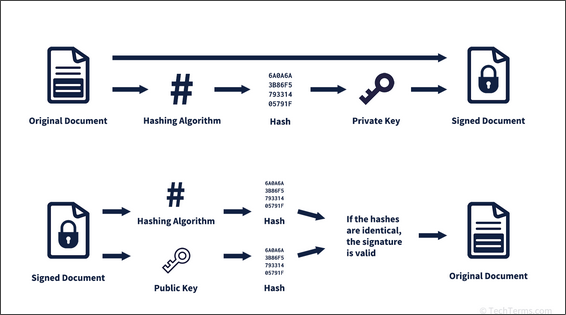
Digitally Signatures provide a solution for this problem by incorporating a string of bits generated from a hash algorithm and a cryptographic key.
A Hash function takes some kind of input(like some text or a file) and outputs a unique string that identifies this input. For example, altering a single bit of the original file will result in a completely different hash output. By comparing the hash output of the received file and the hash of the original file, users can verify that the downloaded file has not been tampered with.
Digitally signatures of GPG go one step further they also take also take in consideration an cryptographic key. This allows users to cross verify the digital signature against the cryptographic key associated with the person or organization they believe the file originates from. This step ensures that the file truly comes from the expected source.
Here’s how the algorithm works:
- User A want to digitally sign a file m, and user B wants to verify if their downloaded file matches the file m and comes from user A.
- User A creates a hash of the file m to be sent. This hash in then encrypted with the private key of user A and sent along the original file.
- To verify the file, user B decrypts the received hash using the public key of user A. After which, user B creates a hash of the downloaded file and compares it with the decrypted hash.
- If the message has been altered the hash value will not match.

Some Consideration
An important thing for GPG to function properly, is obtaining the public key of the recipient(for sending messages) or the sender(for verifying digital signatures) is essential. However, this introduces a challenge: how can you be certain that the received public key truly belongs to the intended person and not a malicious actor?
There are several methods that address this:
- In-Person Key Exchange: Exchanging the keys in Person allows for checking the identify of the the person the keys belongs to.
- Centralized Verification Organizations: Another approach is to utilize a central organization which is tasked with verifying public keys. These organization can authenticate users, to make sure that a public key relong belongs to the Person. Other User can then retrieve public keys from these trusted sources.
Application
Next up, I want to explore some practical application on using GPG. While GPG is typically pre-installed on Linux systems, Windows users may need to install it.
Generating and Exporting GPG Keys
To generate a GPG, follow thesese steps:
- Open your terminal or command prompt
- Run the following command to initalize the key generation process:
1gpg --gen-key - You will be prompted to enter your name and email address that will associated with your GPG key. Additionally, you will need to create and enter a passphrase which protects your private key. It is crucial to securely store both your private key and your passphrase and not loosing them. If lost, there’s no way to recover them. Also, make sure to never share your private key with others; this key should only be seen and used by you.
- After generating a key, you can list your created GPG keys along with its ID using:
1gpg --list-secret-keys --keyid-format=long - To export your public created GPG key:
1gpg --export --armor --output exported_keys.asc - If, you need to export your private GPG key, use:
1gpg --export-secret-keys --armor --output private_key.asc
Note: You will be prompted to enter your passphrase to execute this command.
Personally I would recommend making a backup of the private key and securely storing it on a hard drive or other offline storage media.
Singning Blog Bost and Git commit with PGP
After getting into GPG, I was curious for which practical(or not so practical) application I could use it for. As mentioned earlier, there are two big usage cases for GPG: encryption and digital signatures. This lead me thinking, “What could I digitally sign?” - two application that came to my mind was signing git commits and blog posts(emails are an option too).

Assuming you have already generated your GPG key in the device from whiich you intend to sign, the GPG key should already be imported into your credential/encryption key manager. If not, you first need to import your GPG key:
1gpg --import private_key.asc
Signing Git Commits
To sign a Git commit, you can use the -S argument when committing with Git:
1git commit -S -m "message"
When you use a remote repository like GitHub you might first need to verify the GPG key. To do that, follow these steps:
- Navigate to Settings -> SSH and GPG keys on GitHub
- Press the New GPG key button to add a GPG key
Once added your commits should appear as verified.

Signing Blog Posts
As previously mentioned in one of my blog posts, I utilize Hugo, a static site generator, to create my website and host it as GitHub Page. I decided to enhance the trustworthiness of my posts by incoperating digital signatures. This involves automatically creating and displaying GPG signatures for each post, allowing users to verify the authenticity of the content:

Automating Signature Creation
In order to automatically generate signatures for my blog posts, I created a shell script named deploy_to_github.sh. This script performs the following tasks:
- Set my PGP key ID and define the folders where my markdown files and signed files will be located.
- Export GPG environment variables, including the GPG home directory. Replace “lupos” with your own username.
- Verify that a commit message is provided as an argument.
- Find all markdown files recursively, sign each with the specified PGP key, and save the detached signatures in the static folder.
- Move all signature files from the source folder to the static Hugo folder.
- Add signed files to Git, commit changes with a signed message, and push to the remote repository.
Here is the script in full
 1#!/bin/bash
 2
 3# Set your PGP key ID
 4PGP_KEY_ID="10E75F565D2CD2D3"
 5
 6# Set the folders where your markdown files and signed files will be located
 7TARGET_FOLDER="./content"
 8STATIC_FOLDER="./static"
 9
10# Export GPG environment variables
11# where lupos stands you need to write down your own name
12export GNUPGHOME="/home/lupos/.gnupg"
13GPG_TTY=$(tty)
14export GPG_TTY
15
16# Check if a commit message is provided as an argument
17if [ -n "$1" ]; then
18    COMMIT_MESSAGE="$1"
19else
20    echo "Error: Please provide a commit message."
21    exit 1
22fi
23
24# Find all markdown files recursively and sign each with the PGP key
25find "$TARGET_FOLDER" -type f -name "*.md" -exec sh -c '
26    for file do
27        gpg --yes --armor --output "$file.asc" --detach-sign --default-key "$PGP_KEY_ID" "$file"
28    done
29' sh {} +
30
31# Find all .asc files in the source folder and move them to the static folder
32find "$TARGET_FOLDER" -type f -name "*.asc" -exec mv {} "$STATIC_FOLDER" \;
33
34# Add all changes to Git
35git add "$TARGET_FOLDER"/*.asc
36
37# Commit changes
38git commit -S -m "$COMMIT_MESSAGE"
39
40# Push changes to remote repository
41git push
Whenever I’m ready to publish new posts or updates to my GitHub Page, I streamline the process by executing the deploy_to_github.sh script. This script automates the signing of all my blog posts, generating individual signature files (file_name.md.asc) for each post. These signatures are then stored in the static folder.
Following the automated signature creation, the script proceeds to commit the changes and push them to my GitHub repository.
Displaying Signatures
To display the signatures on each blog post, I created a template file named pgp-key.html in the /themes/PaperMod/layouts/partials/templates folder.
Here is the full `pgp-key.html` file
 1{{ $title := .Title }}
 2
 3{{ with .File }}
 4  <style>
 5    #signature {
 6      color: #007BFF; /
 7    }
 8   .span-class {
 9      font-size: 18px;
10      color: black;
11      border: 2px solid #B7B7B7;
12      border-radius: 5px; /* Add rounded corners */
13      padding: 10px;
14      display: inline-block;
15  </style>
16  <!-- Create a link to the static file -->
17  <span class="span-class">
18	This site is
19	<a id="signature" href="{{ printf "/%s.md.asc" .BaseFileName }}">cryptographically signed</a>
20	by my
21	<a id="signature" href="{{ relURL "monkeman_pgp_public_key.asc" }}">public key</a>.
22        (<a id="signature" href="{{ relURL "/posts/pgp/" }}">See More</a>)
23  </span>
24{{ end }}
Ensure to move your public key into the static folder and update the href in the pgp-key.html file with the correct name of your public key.
Finally, I added the following code sniped to the signle.html page in the /themes/PaperMod/layouts/_default folder, just above the <footer>:
1 <!-- custom code-->
2    <span>
3    {{ partial "pgp-key.html" . }}
4    </span><br>
Placing this code snippet in the footer.html will not work, because it depends on the file name to link to the correct signed key.
Following these steps correctly will lead to a seamlessly integrated GPG signature into each post.
Conclusion
This post dived into the world of GPG keys, exploring their functionality, application and significance. I covered the basics of how GPG key works, their uses in encryption and digital signatures, and examined practical applications.
Notable was especially the integration of GPG signatures into both blog posts and Git commits. By automating the signing process and showcasing the cryptographic signatures alongside the content, some level of extra authenticity and trust can be archived.
References:
